Congratulation for wanting to take up a new hobby and especially so HOMEBREWING!
The rewards are many and include being able to make your very own beer at a fraction of the cost of commercial craft beer. You will gain a great deal of satisfaction that not many other hobbies can give especially when sharing the beer with mates and family over and over again. It is the elixir of bonding and mateship and the lubricant for parties and BBQ’s. It is the essence of human friendship.
There is no upper age limit and transcends all races, most creeds and boundaries. It’s a great way to keep the mind ticking even when retirement hits us. And best of all it doesn’t have to cost our retirement fund to get started.
So let’s get into it!
The 5 steps needed to get started and brew beer are;
1. The equipment and ingredients needed
2. Cleaning and sanitising equipment
3. Making your first batch
4. Measurements and the hydrometer
5. Bottling the beer
1. EQUIPMENT AND INGREDIENTS
• The simplest equipment needed consists of a 30 Litre Fermenter and
a. Air Lock and Sealing Grommet
b. Crown Hand Capper
c. 100 Bottle Caps
d. Sterilizing Agent (EG. sodium metabisulphite & citric acid)
e. Bottle Brush with tip
f. Tap with Sediment Reducer
g. Priming Measuring scoop
h. Bottler-Filler with gravity foot
i. Thermometer self-adhesive
j. 1kg Dextrose Brewing Sugar
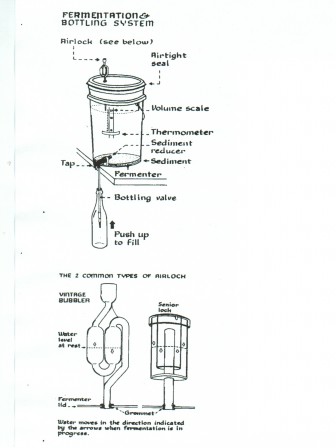
The diagram below (Fig. 1) shows all the components which will get you started.
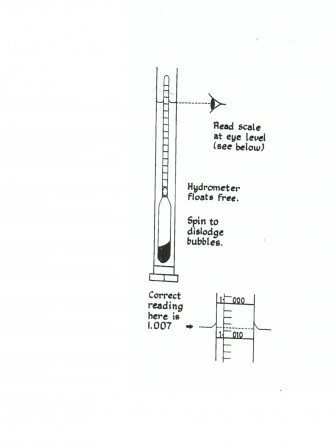
You will need to measure the sugar level in the brew , called “wort”. To do this you will need a hydrometer to measure the sugar content and a container to hold the brew to measure (see fig. 2).
- Fig. 1 Basic Brewing Kit Parts

Now all you need is a can of extract such as the 1.7kg Coopers extract can and 1 kg of dextrose.
Follow the instructions shown on the underlid of the can. You will also be provided with a sachet of yeast
If you are brewing for the first time it’s a good idea to ask at your local brew shop for help.
2. Cleaning and sanitising equipment
The beginning of a good beer starts with good hygiene! The importance of this step should never be underestimated- the first step is making sure all your equipment coming in contact with the sugary solution (wort) or beer is clean and sanitary.
How do you do this?
If your equipment is dirty remove the soil by using specially designed cleansers obtained from the brewshop or if you have “Napisan” in the laundry this is a powerful cleanser leaving no smelly residues.
The method of application depends on the severity of the soil. If heavy soil exists then a soaking would be in order. Start with heating up some water until about 50 deg.C. Carefully pour into the soiled container such as the plastic fermenter, enough to cover the heavily soiled area. Make sure all rubber seals do not come in contact with the hot water. Add about a tablespoon , or as directed, to the water and stir it in. and leave it for several hours.
Safety: you should wear safety goggles and rubber gloves when performing this operation, and follow safety instructions on the packet.
With elbow length rubber gloves on you can remove the soil easily with a sponge or a no scratch scourer. Never use hard cleaning implements that will scratch the surface.
Drain the detergent and rinse with plenty of clean tap water. Drain the vessel and allow to dry before storing or if using to make beer immediately start the sanitising step.
Sanitisation is done by using about 1-2 litres of cold water and adding a sanitiser such as sodium metabisulphite (1 tablespoon) and a pinch of citric acid. Make sure the seals, taps, stirring spoon and grommet etc are also sanitised. Do this an hour before required. Drain sanitiser and allow vessel and implements to drain for 20 minutes. Do not rinse with water!
You are now ready to use the fermenter and all implements required.
3. Making your first batch
Open can of pre-heated extract, pour into fermenter
Rinse can with hot water, add to fermenter
Add remainder of 2 L. hot water (boiled)
Stir contents vigorously until homogenous liquid achieved
Add brewing sugar while adding cold tap water to the fermenter
Stir vigorously until sugar dissolved
Fill the fermenter to 22 L. mark with cold water
Stir contents while filling
Check temperature is no more than 26°C
Pour in dry yeast
Stir vigorously with sanitised spoon to aerate wort and mix contents
Take a sample in a test cylinder & cool to 20°C, measure specific gravity, or its viscosity (see 4. below)
Add water if necessary, mix and retest gravity
Rinse tap with water or sanitiser when finished
Close the fermenter and place airlock in position and fill with clean water or alcohol
Place the fermenter in a cool spot overnight to allow the tempertaure to drop to ~18°C, if possible
Next day place fermenter at a constant room temperature (~20°C)
4. Measurements and the hydrometer
Figure 2. shows the hydrometer placed in the sugary solution in a tall cylinder. It is read by using the specific gravity (S.G.) scale on the glass hydrometer as illustrated.
This reading is known as the original gravity and most beers will be around 1.040 S.G. Do not return the contents back to the fermenter for risk of contamination.
I suggest that if this is your first time brewing do not attempt to adjust this reading with water if it is much higher than 1.040
When fermentation is complete, ie when bubbling stops and it does not taste sweet leave another day and re-measure the gravity. It should be around 1.010 S.G. This is called the final gravity (F.G.).
To calculate the approximate alcohol content just use this formula;
%ABV (alcohol by volume)= OG-FG (omit decimal point)= and Multiply by 0.14 =
For example OG= 1.040, F.G = 1.010
%ABV= (1040-1010)x 0.14= 4.2%
We are not finished yet because we will be adding sugar to each bottle to carbonate the beer in the bottle (see next section). This will produce extra alcohol, about 0.5 % ABV, so the total alcohol will be about 4.7% ABV.
5. Bottling the beer
The beer is flat at this stage so needs to be carbonated.
We achieve this by adding a quantity of sugar to each bottle, fill it with the yeast beer and cap it tight.
The minimum requirement for bottling equipment is a capper of some sort that will apply a crown seal to each bottle, and a filling tube (see fig. 1) . Also you will need some form of sugar to complete the bottle fermentation. I use Coppers carbonation drops because of ease of use and less messy.
After cleaning (if required) and sanitising the bottles I allow them to drain exactly as I did the fermenter before brewing.
If using 330 ml bottles I fill the bottle with beer (see fig. 1) and then place one carbonation drop in (for large bottles over 620ml add 2 drops). I then fill 2 more bottles and then cap each one. I repeat this series of 3 bottles if I am doing this by myself in order to minimise airborne dust particles and bacteria entering the bottles.
Once all the beer has been bottled store in a constant room temperature place at about 20 deg. C. for 2 weeks. Keep in a dark location to avoid any light contact which will make the beer skunky.
After 2 weeks try a bottle after initially cooling it in a refrigerator. If it is still flat and sweet allow the remaining bottles to stay at room temperature a further week and try again.
You now should have your first homebrewed beer. For best results store the beer in the refrigerator after proving it is carbonated.
Good drinking and share it around responsibly at your next gathering with friends and family. You’re sure to impress.
Courses to help you get started are also available such as those run by Vincent Costanzo of Costanzo Brewing School which is part of Costanzo Brewing Consultants. For further details see https://costanzobrewing.com/home-brewing-courses
Disclaimer: While attempts have been made to verify information provided in this presentation, neither the author nor the publisher assumes any responsibility for errors, omissions or contrary interpretation of the subject matter herein.
The reader of this presentation assumes responsibility for the use of these materials and information. Adherence to all laws and regulations, federal, state and local, governing professional licensing, business practices, advertising and all other aspects of doing business in Australia , or any other jurisdiction, is the sole responsibility of the purchaser or reader of this course material. The author or publisher assumes no responsibility or liability whatsoever on behalf of any purchaser or reader of these materials. We do not guarantee any results you may or may not get as a result of following our recommendations. It is your responsibility to test every strategy for yourself.

